Target .NET API Version: .NET 6.0
Overview
In today’s global market, supporting multiple languages in your API is crucial for reaching a broader audience. Whether you are building a SaaS platform, an e-commerce site, or a mobile app, adding multi-language functionality to your .NET Core API ensures that users can interact with your services in their preferred language. In this guide, we’ll walk you through the steps to implement multi-language support in a .NET Core API using best practices.
Create Service:
public static class LocalizationService
    {
        private static ResourceManager _resourceManager = new ResourceManager("YourProject.Properties.SharedResource", typeof(LocalizationService).Assembly);
        private static string _currentLanguage = "en-US";
        public static void SetCurrentLanguage(string language)
        {
            var languageCode = "en-US";
            if (language.Contains("Chinese"))
                languageCode = "zh-CN";

            _currentLanguage = languageCode;
        }

        public static string ToLocalizedString(this string key)
        {
            return _resourceManager.GetString(key, new CultureInfo(_currentLanguage));
        }
    }
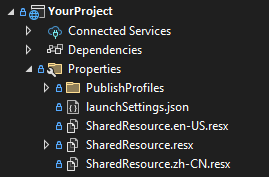
Create SharedResources.resx in Properties folder

Create Api Get translated text
[AllowAnonymous]
[HttpPost("v1/test-translate")]
public async Task<IActionResult> TestTranslate(YourRequestModel request)
{
            try
            {
                // Set the culture dynamically
                LocalizationService.SetCurrentLanguage(request.Language);
                var translatedMessage = "Hello World".ToLocalizedString();
            }
            catch {}
     return Ok();
}
Implementing multi-language support in your .NET Core API is not just a feature; it’s a way to connect with users globally and provide a better user experience. Follow the steps outlined in this guide, and you’ll have a fully localized API in no time. Don’t forget to subscribe for more tips and tricks on .NET Core development!
Happy coding!